The SSD (Western Digital SN730 NVMe 256 GB) which was removed in this article ("Replaced the SSD in my gaming PC") was put in the USB connection NVMe M.2 SSD case, but there is no place where it is not useful. I started thinking that I could use it to upgrade an old PC (Dell Inspiron 660s) to an SSD.
To begin with, Inspiron 660s does not have an M.2 slot, so it is not possible to use M.2 NVMe SSD as it is.
However, I found an adapter card that converts M.2 NVMe to PCIe. I ordered it immediately.
NVMe PCIe x4 x2 M.2 NGFF SSD to PCIe x1 Converter Adapter PCIe x1 to M.2 Full/Half Size

The Inspiron 660s has one PCIe x16 and one PCIe x1 slot, but since I have a graphics card in the PCIe x16 slot, I chose the one that supports PCIe x1. If there is room in the PCIe slot, it is likely to perform better with a card that supports PCIe x4.

I found out after ordering the above-mentioned adapter card, but old PC (chipset) does not support NVMe, and it is not possible to boot from NVMe SSD even if I use the above-mentioned adapter.
When I was about to give up, I found the information that the motherboard can be booted from NVMe SSD by using free software called Clover EFI bootloader, even if the motherboard does not support NVMe.
I tried it, and it worked, so here are the steps.
The work was carried out in the following manner.
I used the free software called "EaseUS Todo Backup Free" for the clone (duplicate) of HDD to SSD done in the later process. Since this software has a function to make a USB boot disk, you should make it beforehand.
Create a boot disk for the Clover EFI bootloader, which is the key to this work.
Download the latest version of the image (*.lzma) from the Clover EFI bootloader download page. It is compressed, so you can decompress it with 7-zip and so on to get an ISO format image file. You can write it to a USB stick using Rufus, for example.
By default, the driver for NVMe is disabled, so enable it. Concretely, move a file named "NvmExpressDxe.efi" in "\EFI\CLOVER\drivers\off" folder in the boot disk to "\EFI\CLOVER\drivers\UEFI" folder.
Install the NVMe SSD into NVMe SSD を the NVMe to PCIe conversion adapter card and insert the adapter card into a PCIe slot on the PC.
Boot the PC from the EaseUS Todo Backup boot disk that I previously created.
When the EaseUS Todo Backup screen appears, select "Clone" to duplicate the contents of the HDD to the SSD.
This time it was in the direction of a smaller capacity, but it adjusted automatically.
Turn off the PC and remove the EaseUS Todo Backup bootdisk and boot from the Clover EFI bootloader bootdisk.
I got an error when Secure Boot was enabled, so I disabled it in the BIOS settings.
If everything goes well, the screen for selecting the boot source will appear, and choose the SSD one. Because I didn't understand which one is SSD at first, I selected it by guesswork, and when Windows starts up, I confirmed whether the C drive is SSD or not, and repeated.
From now on, every time booting from the SSD, it will go through the Clover EFI bootloader.
It is now possible to boot Windows from the NVMe SSD.
Because the contents of HDD are no longer needed, I deleted all the partitions once using "EaseUS Partition Master Free", and made a new partition for data.
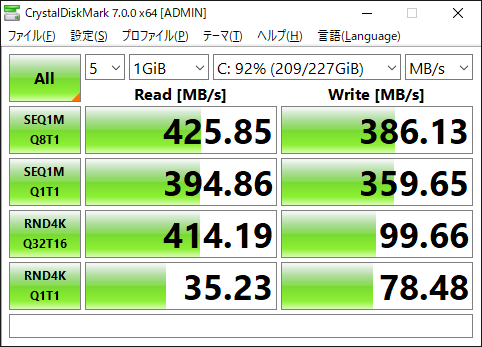
Finally, the benchmark result (by CrystalDiskMark) of the original HDD and the SSD which is newly added is posted.

 Home
Home